


本文主要和大家分享了angular结合ztree异步加载节点数据的难点以及方法,有这方面需求的朋友参考下吧,希望能帮助到大家。
1 前提准备
1.1 新建一个angular4项目

1.2 去zTree官网下载zTree
zTree官网:点击前往
三少使用的版本:点击前往

2 编程步骤
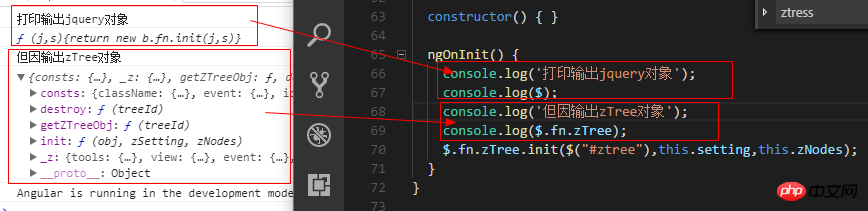
从打印出zTree对象可以看出,zTree对象利用init方法来实现zTree结构;init方法接收三个参数
参数1:一个ul标签的DOM节点对象
参数2:基本配置对象
参数3:标题信息数组
2.1 在index.html中引入相关js、css
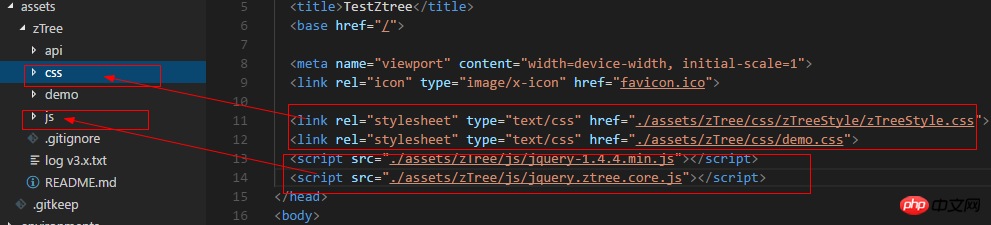
TestZtree
View Code
2.2 在TS文件中声明jquery对象
declare var $ : any;
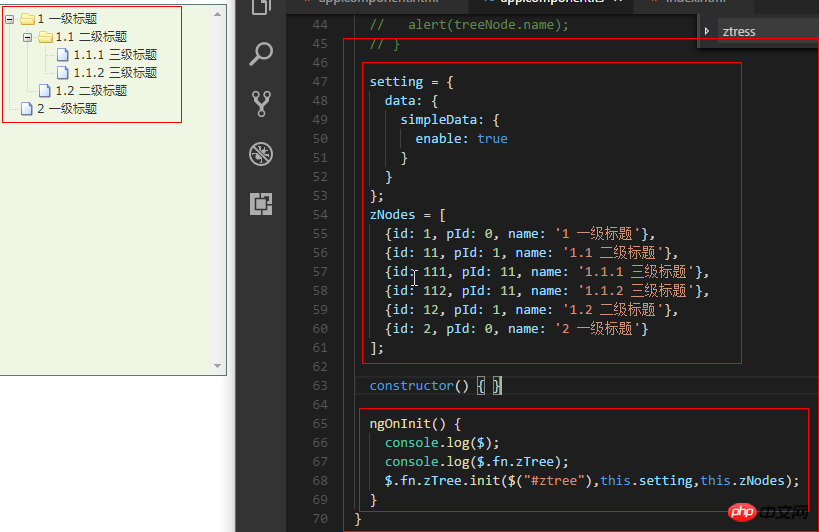
2.3 在TS文件中编写代码
import { Component, OnInit } from '@angular/core';
declare var $ : any;
@Component({
 selector: 'app-root',
 templateUrl: './app.component.html',
 styleUrls: ['./app.component.scss']
})
export class AppComponent implements OnInit {

 // setting = {
 // view: {
 // showLine: true,
 // showIcon: true,
 // fontCss: this.getFont
 // },
 // data: {
 // simpleData: {
 // enable: true,
 // idKey: 'id',
 // pIdKey: 'pId'
 // }
 // },
 // callback: {
 // onClick: this.onCzTreeOnClick
 // }
 // };
 // zNodes = [
 // {id: 1, pId: 0, name: '1 一级标题', open: true, iconOpen:"assets/zTree/css/zTreeStyle/img/diy/1_open.png", iconClose:"assets/zTree/css/zTreeStyle/img/diy/1_close.png"},
 // {id: 11, pId: 1, name: '1.1 二级标题', open: true, font:{'background-color':'skyblue', 'color':'white'}},
 // {id: 111, pId: 11, name: '1.1.1 三级标题 -> 博客园', url: 'http://www.cnblogs.com/NeverCtrl-C/'},
 // {id: 112, pId: 11, name: '1.1.2 三级标题 -> 单击', click: "alert('你单击了')"},
 // {id: 12, pId: 1, name: '1.2 二级标题'},
 // {id: 2, pId: 0, name: '2 一级标题'}
 // ]
 // getFont(treeId, node) {
 // return node.font ? node.font : {};
 // }
 // onCzTreeOnClick(event, treeId, treeNode, clickFlag) {
 // alert(treeNode.name);
 // }
 setting = {
 data: {
 simpleData: {
 enable: true
 }
 }
 };
 zNodes = [
 {id: 1, pId: 0, name: '1 一级标题'},
 {id: 11, pId: 1, name: '1.1 二级标题'},
 {id: 111, pId: 11, name: '1.1.1 三级标题'},
 {id: 112, pId: 11, name: '1.1.2 三级标题'},
 {id: 12, pId: 1, name: '1.2 二级标题'},
 {id: 2, pId: 0, name: '2 一级标题'}
 ];
 constructor() { }
 ngOnInit() {
 console.log($);
 console.log($.fn.zTree);
 $.fn.zTree.init($("#ztree"),this.setting,this.zNodes);
 }
}
View Code
2.4 在组件HTML中编写代码
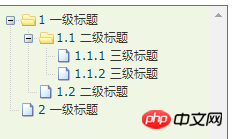
2.5 效果展示
3 zTree基本功能
3.1 不显示连接线
3.1.1 官方文档
不显示标题之间的连接线
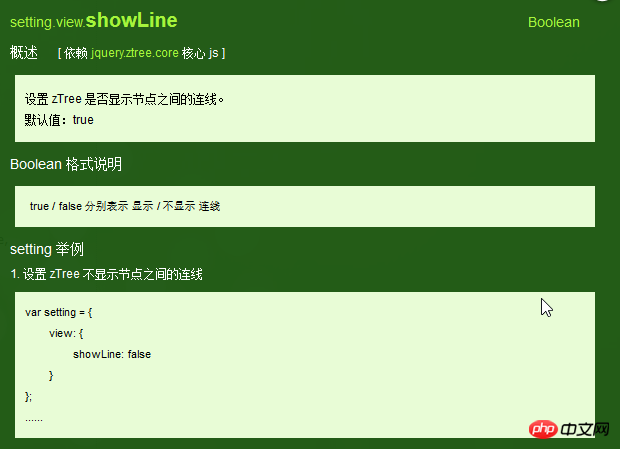
3.1.2 编程步骤
在基本配置对象中指定showLine属性的值为false即可
 setting = {
 data: {
 simpleData: {
 enable: true
 }
 },
 view: {
 showLine: false
 }
 };
3.2 不显示节点图标
3.2.1 官方文档
去掉节点前面的图标
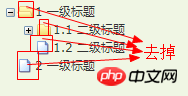
3.2.2 编程步骤
将基本配置对象的showIcon属性设为false即可
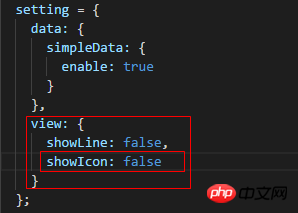
setting = {
 data: {
 simpleData: {
 enable: true
 }
 },
 view: {
 showLine: false,
 showIcon: false
 }
 };
View Code
3.3 自定义节点图标
3.3.1 官方文档
更改节点的图标
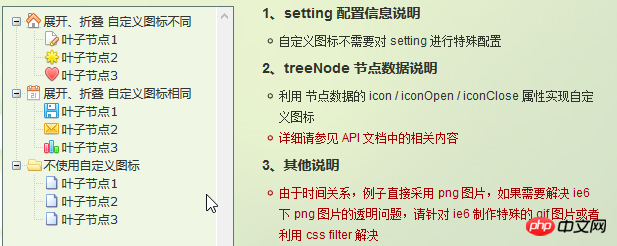
3.3.2 编程步骤
为treeNode节点数据设置icon/iconOpen/iconClose属性即可

3.4 自定义字体
3.4.1 官方文档
更改节点字体的样式
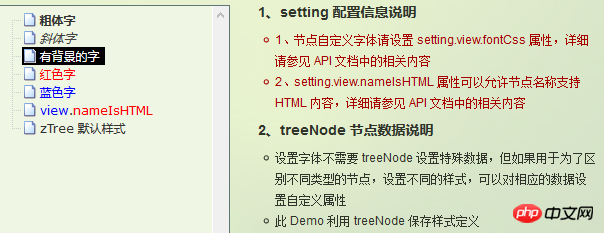
3.4.2 编程步骤

为treeNode节点数据设置font属性即可,font属性的值是一个对象,该对象的内容和style的数据一样

3.4.3 效果展示
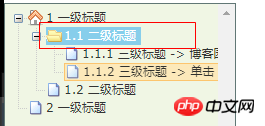
3.5 超链接
3.5.1 官方文档
点击节点标题就会自动跳转到对应的url
注意01:click属性只能进行最简单的 click 事件操作。相当于 的内容。 如果操作较复杂,请使用 onClick 事件回调函数。
3.5.2 编程步骤
为treeNode节点数据设置url、click属性即可
技巧01:设置click属性时,属性值必须是一些简单的onClick事件
技巧02:设置target属性时,属性值有 _blank 和 _self
_blank -> 用一个新窗口打开
_self -> 在原来的窗口打开

 zNodes = [
 {id: 1, pId: 0, name: '1 一级标题', open: true, iconOpen:"assets/zTree/css/zTreeStyle/img/diy/1_open.png", iconClose:"assets/zTree/css/zTreeStyle/img/diy/1_close.png"},
 {id: 11, pId: 1, name: '1.1 二级标题', open: true, font:{'background-color':'skyblue', 'color':'white'}},
 {id: 111, pId: 11, name: '1.1.1 三级标题 -> 博客园1', url: 'http://www.cnblogs.com/NeverCtrl-C/', target: '_blank'},
 {id: 113, pId: 11, name: '1.1.1 三级标题 -> 博客园2', url: 'http://www.cnblogs.com/NeverCtrl-C/', target: '_self'},
 {id: 112, pId: 11, name: '1.1.2 三级标题 -> 单击', click: "alert('你单击了')"},
 {id: 12, pId: 1, name: '1.2 二级标题'},
 {id: 2, pId: 0, name: '2 一级标题'}
 ]
View Code
3.6 单击控制
3.6.1 官方文档
点击节点标题时触发相应的方法
技巧01:在angular中可以利用这个用法来实现路由跳转
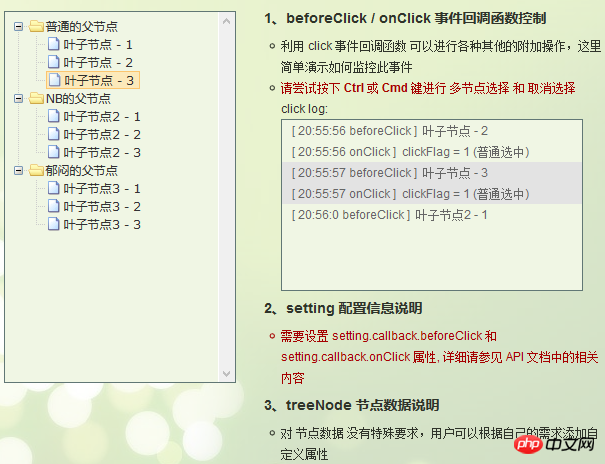
3.6.2 编程步骤
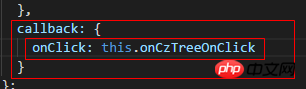
设置基本配置对象的onClick属性
技巧01:onClick属性值是一个方法的引用,我们需要自己编写这个方法
 setting = {
 view: {
 showLine: true,
 showIcon: true,
 fontCss: this.getFont
 },
 data: {
 simpleData: {
 enable: true,
 idKey: 'id',
 pIdKey: 'pId'
 }
 },
 callback: {
 onClick: this.onCzTreeOnClick
 }
 };
View Code
编写onClick触发方法

 onCzTreeOnClick(event, treeId, treeNode, clickFlag) {
 alert(treeNode.name);
 }
View Code
3.6.3 代码汇总
import { Component, OnInit } from '@angular/core';
declare var $ : any;
@Component({
 selector: 'app-root',
 templateUrl: './app.component.html',
 styleUrls: ['./app.component.scss']
})
export class AppComponent implements OnInit {
 setting = {
 view: {
 showLine: true,
 showIcon: true,
 fontCss: this.getFont
 },
 data: {
 simpleData: {
 enable: true,
 idKey: 'id',
 pIdKey: 'pId'
 }
 },
 callback: {
 onClick: this.onCzTreeOnClick
 },
 // async: {
 // enable: true,
 // url:"http://localhost:3000/data",
 // type: "get",
 // // autoParam:["id", "name=n", "level=lv"],
 // // otherParam:{"otherParam":"zTreeAsyncTest"},
 // dataFilter: this.filter
 // }
 };
 zNodes = [
 {id: 1, pId: 0, name: '1 一级标题', open: true, iconOpen:"assets/zTree/css/zTreeStyle/img/diy/1_open.png", iconClose:"assets/zTree/css/zTreeStyle/img/diy/1_close.png"},
 {id: 11, pId: 1, name: '1.1 二级标题', open: true, font:{'background-color':'skyblue', 'color':'white'}},
 {id: 111, pId: 11, name: '1.1.1 三级标题 -> 博客园1', url: 'http://www.cnblogs.com/NeverCtrl-C/', target: '_blank'},
 {id: 113, pId: 11, name: '1.1.1 三级标题 -> 博客园2', url: 'http://www.cnblogs.com/NeverCtrl-C/', target: '_self'},
 {id: 112, pId: 11, name: '1.1.2 三级标题 -> 单击', click: "alert('你单击了')"},
 {id: 12, pId: 1, name: '1.2 二级标题'},
 {id: 2, pId: 0, name: '2 一级标题'}
 ]
 getFont(treeId, node) {
 return node.font ? node.font : {};
 }
 // filter(treeId, parentNode,responseData) {
 // console.log(responseData);
 // if (responseData) {
 // for(var i =0; i < responseData.length; i++) {
 // responseData[i].name += "动态节点数据" + responseData[i].id;
 // }
 // }
 // return responseData;
 // }
 onCzTreeOnClick(event, treeId, treeNode, clickFlag) {
 alert(treeNode.name);
 }
 constructor() { }
 ngOnInit() {
 console.log('打印输出jquery对象');
 console.log($);
 console.log('但因输出zTree对象');
 console.log($.fn.zTree);
 $.fn.zTree.init($("#ztree"),this.setting,this.zNodes);
 // $.fn.zTree.init($("#ztree"),this.setting);
 }
}
View Code
3.7 异步加载节点数据
3.7.1 官方文档
节点的数据是从后台进行获取的
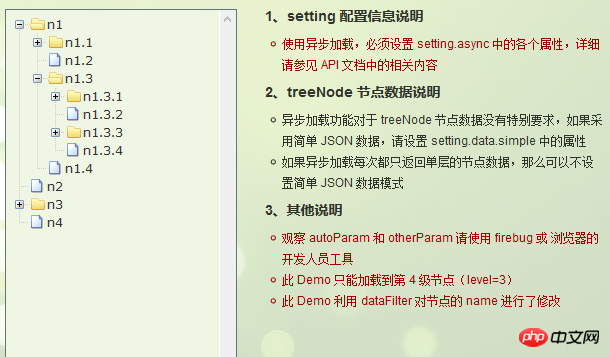
3.7.2 编程步骤
技巧01:异步加载节点数据时init方法不用传递第三个参数

> 准备一个后台用于返回JSON格式的数据
技巧01:返回的JSON数据是一个列表,格式为
[
 {
 "id": 1,
 "pId": 0,
 "name": "1 one"
 },
 {
 "id": 2,
 "pId": 0,
 "name": "2 two"
 }
 ]
技巧02:三少偷懒,是利用json-server模拟的后台数据,哈哈;json-server
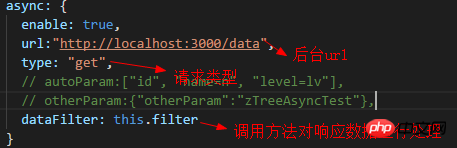
> 设置基本配置对象的async属性
 setting = {
 view: {
 showLine: true,
 showIcon: true,
 fontCss: this.getFont
 },
 data: {
 simpleData: {
 enable: true,
 idKey: 'id',
 pIdKey: 'pId'
 }
 },
 callback: {
 onClick: this.onCzTreeOnClick
 },
 async: {
 enable: true,
 url:"http://localhost:3000/data",
 type: "get",
 // autoParam:["id", "name=n", "level=lv"],
 // otherParam:{"otherParam":"zTreeAsyncTest"},
 dataFilter: this.filter
 }
 };
View Code
> 编写响应数据处理方法
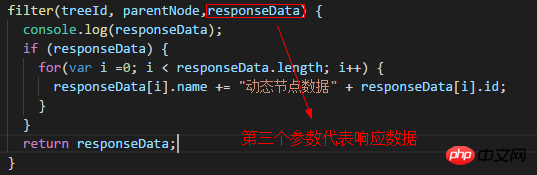
filter(treeId, parentNode,responseData) {
console.log(responseData);
if (responseData) {
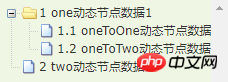
for(var i =0; i < responseData.length; i++) {
responseData[i].name += "动态节点数据" + responseData[i].id;
}
}
return responseData;
}View Code
3.7.3 代码总汇
{
 "data":
 [
 {
 "id": 1,
 "pId": 0,
 "name": "1 one"
 },
 {
 "id": 11,
 "pId": 1,
 "name": "1.1 oneToOne"
 },
 {
 "id": 12,
 "pId": 1,
 "name": "1.2 oneToTwo"
 },
 {
 "id": 2,
 "pId": 0,
 "name": "2 two"
 }
 ]
}
模拟后台响应数据
HTML
import { Component, OnInit } from '@angular/core';
declare var $ : any;

@Component({
 selector: 'app-root',
 templateUrl: './app.component.html',
 styleUrls: ['./app.component.scss']
})
export class AppComponent implements OnInit {

 setting = {
 view: {
 showLine: true,
 showIcon: true,
 fontCss: this.getFont
 },
 data: {
 simpleData: {
 enable: true,
 idKey: 'id',
 pIdKey: 'pId'
 }
 },
 callback: {
 onClick: this.onCzTreeOnClick
 },
 async: {
 enable: true,
 url:"http://localhost:3000/data",
 type: "get",
 // autoParam:["id", "name=n", "level=lv"],
 // otherParam:{"otherParam":"zTreeAsyncTest"},
 dataFilter: this.filter
 }
 };

 // zNodes = [
 // {id: 1, pId: 0, name: '1 一级标题', open: true, iconOpen:"assets/zTree/css/zTreeStyle/img/diy/1_open.png", iconClose:"assets/zTree/css/zTreeStyle/img/diy/1_close.png"},
 // {id: 11, pId: 1, name: '1.1 二级标题', open: true, font:{'background-color':'skyblue', 'color':'white'}},
 // {id: 111, pId: 11, name: '1.1.1 三级标题 -> 博客园1', url: 'http://www.cnblogs.com/NeverCtrl-C/', target: '_blank'},
 // {id: 113, pId: 11, name: '1.1.1 三级标题 -> 博客园2', url: 'http://www.cnblogs.com/NeverCtrl-C/', target: '_self'},
 // {id: 112, pId: 11, name: '1.1.2 三级标题 -> 单击', click: "alert('你单击了')"},
 // {id: 12, pId: 1, name: '1.2 二级标题'},
 // {id: 2, pId: 0, name: '2 一级标题'}
 // ]

 getFont(treeId, node) {
 return node.font ? node.font : {};
 }

 filter(treeId, parentNode,responseData) {
 console.log(responseData);
 if (responseData) {
 for(var i =0; i < responseData.length; i++) {
 responseData[i].name += "动态节点数据" + responseData[i].id;
 }
 }
 return responseData;
 }

 onCzTreeOnClick(event, treeId, treeNode, clickFlag) {
 alert(treeNode.name);
 }

 constructor() { }

 ngOnInit() {
 console.log('打印输出jquery对象');
 console.log($);
 console.log('但因输出zTree对象');
 console.log($.fn.zTree);
 // $.fn.zTree.init($("#ztree"),this.setting,this.zNodes);
 $.fn.zTree.init($("#ztree"),this.setting);
 }
}
TS
3.7.4 效果展示
相关推荐:


