最近,因为工作需要一个树形下拉框的组件,经过查资料一般有两种的实现方法。其一,就是使用ztree实现;其二,就是使用easyui实现。因为公司的前端不是使用easyui设计的,故这里我选择了ztree来实现下拉树。
这里使用简单的数据格式(即简单的Json格式)类似如下Json:
var zNodes =[
      {id:1, pId:0, name:"北京"},
      {id:2, pId:0, name:"天津"},
      {id:3, pId:0, name:"上海"},
      {id:6, pId:0, name:"重庆"},
      {id:4, pId:0, name:"河北省", open:true, nocheck:true},
      {id:41, pId:4, name:"石家庄"},
      {id:42, pId:4, name:"保定"},
      {id:43, pId:4, name:"邯郸"},
      {id:44, pId:4, name:"承德"},
      {id:5, pId:0, name:"广东省", open:true, nocheck:true},
      {id:51, pId:5, name:"广州"},
      {id:52, pId:5, name:"深圳"},
      {id:53, pId:5, name:"东莞"},
      {id:54, pId:5, name:"佛山"},
      {id:6, pId:0, name:"福建省", open:true, nocheck:true},
      {id:61, pId:6, name:"福州"},
      {id:62, pId:6, name:"厦门"},
      {id:63, pId:6, name:"泉州"},
      {id:64, pId:6, name:"三明"}
     ];
这里首先需要一个实体bean,用来封装对应查出来的数据,如下:
public class ZtreeNode {

  // id
  private String id;
  // 父id
  private String pId;
  // 显示名称
  private String name;
  // 是否打开 (这里默认是不打开的,如果需要打开,设为true)
  // private boolean open ;
  // 能否选择 (设置节点是否能够选择,默认都能选择,设为true对应的节点不能选择)
  // private boolean nocheck ;

  /**getter and setter*/
}
这里需要注意的是 pId 中的第二的字母是大写的,如果写成小写的就不能构造成树形结构,所有的都是根节点。
然后,将从数据库中查出来的数据,转换为对应的ztree需要的bean,再转换为相应的Json,代码如下:
立即学习“Java免费学习笔记(深入)”;
// 获取商品分类树 返回json
  public String getGoodsCategoryTreeJson() {
    List allGoodsCategoryList = goodsCategoryService.getGoodsCategoryTreeJson() ;
    List ztreelist = new ArrayList();
    for(GoodsCategory gcty : allGoodsCategoryList){
      ZtreeNode treenade = new ZtreeNode();
      treenade.setId(gcty.getId());
      treenade.setpId(gcty.getParent()==null?"":gcty.getParent().getId());
      treenade.setName(gcty.getName());
      ztreelist.add(treenade);
    }
    return ajax(ztreelist);
  }
将list转换为对应的Json方法,如下:
用到的Json工具包:
import org.springframework.base.util.JsonUtil;

private static final String HEADER_ENCODING = "UTF-8";
private static final boolean HEADER_NO_CACHE = true;
private static final String HEADER_TEXT_CONTENT_TYPE = "text/plain";
private static final String HEADER_JSON_CONTENT_TYPE = "text/plain";

// AJAX输出
  protected String ajax(String content, String contentType) {
    try {
      HttpServletResponse response = initResponse(contentType);
      response.getWriter().write(content);
      response.getWriter().flush();
    } catch (IOException e) {
      e.printStackTrace();
    }
    return NONE;
  }

  // 根据文本内容输出AJAX
  protected String ajax(String text) {
    return ajax(text, HEADER_TEXT_CONTENT_TYPE);
  }

  // 根据操作状态输出AJAX
  protected String ajax(Status status) {
    HttpServletResponse response = initResponse(HEADER_JSON_CONTENT_TYPE);
    Map jsonMap = new HashMap();
    jsonMap.put(STATUS_PARAMETER_NAME, status.toString());
    JsonUtil.toJson(response, jsonMap);
    return NONE;
  }

  // 根据操作状态、消息内容输出AJAX
  protected String ajax(Status status, String message) {
    HttpServletResponse response = initResponse(HEADER_JSON_CONTENT_TYPE);
    Map jsonMap = new HashMap();
    jsonMap.put(STATUS_PARAMETER_NAME, status.toString());
    jsonMap.put(MESSAGE_PARAMETER_NAME, message);
    JsonUtil.toJson(response, jsonMap);
    return NONE;
  }

  // 根据Object输出AJAX
  protected String ajax(Object object) {
    HttpServletResponse response = initResponse(HEADER_JSON_CONTENT_TYPE);
    JsonUtil.toJson(response, object);
    return NONE;
  }

  // 根据boolean状态输出AJAX
  protected String ajax(boolean booleanStatus) {
    HttpServletResponse response = initResponse(HEADER_JSON_CONTENT_TYPE);
    Map jsonMap = new HashMap();
    jsonMap.put(STATUS_PARAMETER_NAME, booleanStatus);
    JsonUtil.toJson(response, jsonMap);
    return NONE;
  }

  private HttpServletResponse initResponse(String contentType) {
    HttpServletResponse response = ServletActionContext.getResponse();
    response.setContentType(contentType + ";charset=" + HEADER_ENCODING);
    if (HEADER_NO_CACHE) {
      response.setDateHeader("Expires", 1L);
      response.addHeader("Pragma", "no-cache");
      response.setHeader("Cache-Control", "no-cache, no-store, max-age=0");
    }
    return response;
  }
这样前台所需要的数据,就从库里取出,并封装成了对应的Json。
接下来就是前台的实现了,前台需要导入的js和css如下:

这里只有demo.css是自己添加的,其他都是官方制定的,demo.css是将官方的demo用到的css修改的,如下(这里有冗余样式没有删除掉);
div.content_wrap {width: 400px;}
div.content_wrap div.left{float: left;}
div.content_wrap div.right{float: right;width: 340px;}
div.zTreeDemoBackground {text-align:left;}

ul.ztree {margin-top: 10px;border: 1px solid #617775;background: #fefefe;width:220px;height:360px;overflow-y:scroll;overflow-x:auto;}
ul.log {border: 1px solid #617775;background: #f0f6e4;width:300px;height:170px;overflow: hidden;}
ul.log.small {height:45px;}
ul.log li {color: #666666;list-style: none;padding-left: 10px;}
ul.log li.dark {background-color: #E3E3E3;}

/* ruler */
div.ruler {height:20px; width:220px; background-color:#f0f6e4;border: 1px solid #333; margin-bottom: 5px; cursor: pointer}
div.ruler div.cursor {height:20px; width:30px; background-color:#3C6E31; color:white; text-align: right; padding-right: 5px; cursor: pointer}
然后,就是对应的下拉框:
8
这里有一个隐藏的文本框用来存放下拉框选择内容对应的id。
对应的脚本如下:
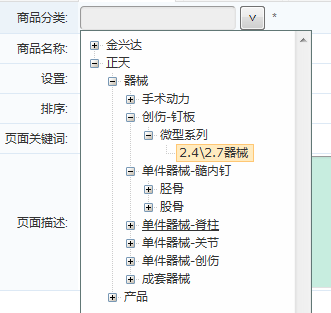
这样,一个下拉框就做完了。
如下图所示:
如果,需要在修改页面中回写相应的下拉列表数据,添加如下的脚本:
以上就是本文的全部内容,希望对大家学习zTree插件有所帮助。